Library Contents Search the Library RV Tech Library Help Page Site Map About Us Tiffin RV Network TRVN Classifieds Campground Reviews Photo Gallery TRVN Store
Appliances Batteries Boondocking/Dry Camping Chassis Clubs & Forums Electrical Electronics Engines Exterior Maintenance Generators Heating & Air Conditioning Interior Maintenance Misc Items Operating Tips Plumbing Red Bay Safety & Health Storage Supplier Contacts Tires and Wheel Rims Towing Transmissions Weighing
![]()
Streets and Trips Tutorial
We use Microsoft Street & Trips a lot for both trip planning and GPS as we travel. We like the fact that we have a large computer screen to work on, rather than the little hard to see screens of many GPS units. We find S&T has many useful features. Finding places along our route or near the places we visit is one of the best features. I will try to explain how some of the Points of Interest features work.
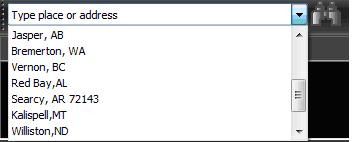
The first method of finding places with S&T is using the Address Line. This could also be called the FIND line or the SEARCH line. It is a long rectangular box near the top of the screen with a down arrow and a binocular icon next to it. On this line you can enter a specific street address including town and state or Zip Code or you can just enter the name of a town with a state or you can just enter a Zip Code and S&T will take you to that location when you click the binocular icon or hit ENTER.
![]()
![]()
Each place or address is saved by S&T for each session – just click the down arrow to bring up the list of places you have been looking at. Slide/scroll through the long list and click to return to a place – quick and easy.
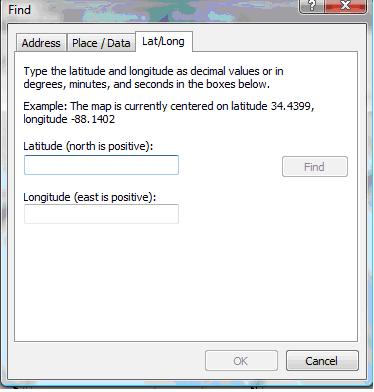
If you have Lat/Lon numbers you can enter them by leaving the address box empty and just Click on the binoculars. This will open a new little Pane called Find where you can then Click on the Lat/Lon tab to open that Pane where you can enter your Lat/Lon and then Click FIND.
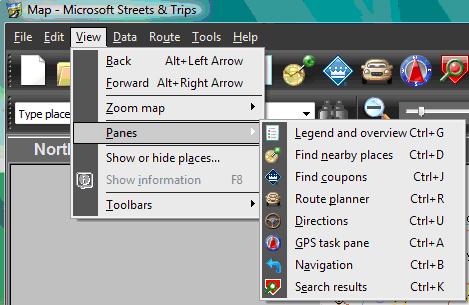
Near the top of the screen is a line I call the Tool Bar which has a bunch of icons. Here I show this bar with numbers below some of the icons and then a list naming the icons. Clicking these icons will cause different Panes to open and close. Each icon has a different function. Refer to this legend if you need to know which icon you might need to Click. There are several of these we never use.

- Create Pushpin
- Legend and Overview
- Find Nearby Places
- Find Coupons
- Route Planner
- GPS Task Pane
- Search Results
- Directions
- Navigation Pane
Above the Tool Bar is another line with words that tell us functions we can open if we Click. Microsoft being Microsoft some of these will take you to some of the same functions as the tool bar as shown below. Below I have Clicked VIEW and then PANES to give some idea of how this works.
Take some time to Click around the different Tools to get familiar with what different tabs and icons might do.
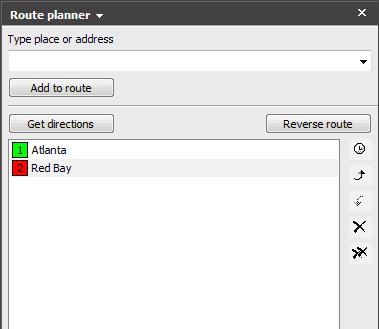
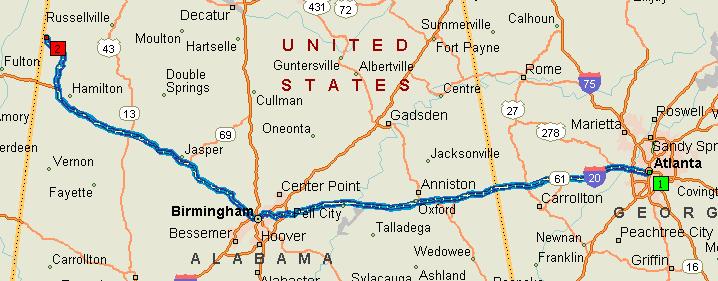
The next neat trick with S&T is Route Planning. This is where I find Right Clicking to be very useful. We can zoom in on a specific location on our map. We can use Find to locate places. But for simplification I will just pick Atlanta to Red Bay, AL. I Right Click on the word Atlanta and a Pane opens with options. I Click ROUTE and another Pane opens with more options. I Click ADD AS START and the Panes close. A green box with the number 1 appears by the word Atlanta.
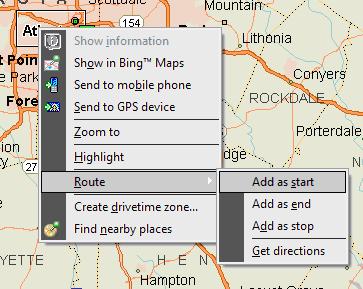
I now move my cursor to Red Bay, AL (you can use the address line to find Red Bay or any other place) on my map and again I RIGHT CLICK on the word Red Bay and then ROUTE and then ADD AS END. Now there is a red number 1 by Red Bay. Up on the Tool Bar is the little car icon which is for Route Planner. Click the car and a left side column pane opens. This is the Route Planner. Click GET DIRECTIONS and the Route Planner will calculate the route and the route will appear on the map as a blue line.
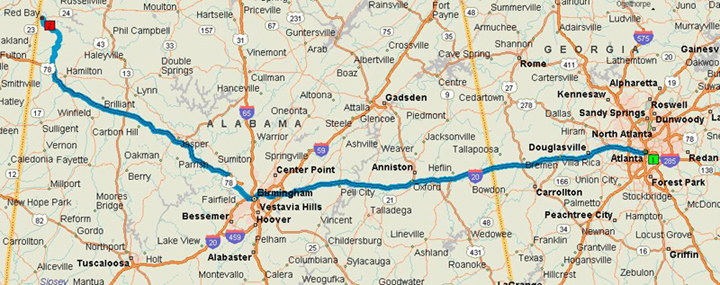
Here is the route S&T has calculated. It is important to note here that we do not totally rely on any GPS to choose the best route. We need to take a close look at the route to determine if it is the route we want to take. If it is not we can modify the route by putting in stops that force the computer to go to different points on our map and then we can have it calculate the route again. We do this by again Right Clicking on the point we want to add to our route. These points are called either stops or waypoints. But to keep it simple here we will just do as the computer says. See Add As Stop in the Route Pane above.
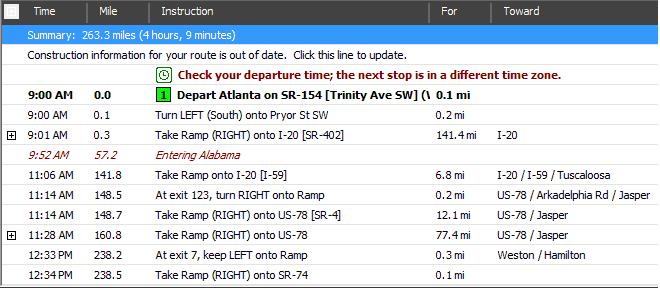
On your computer screen you should now show the map with a blue line marking the chosen route as well as the Route Planner Pane to the left. Above the map you should see the Directions Pane where you will see detailed written directions showing total miles for this route as well as the roads to take and where the turns might be etc. This is the Directions Pane which you can turn On/Off by Clicking the little Steering Wheel icon up on the Toolbar. You can also Open/Close the Route Planner Pane on the left by Clicking the little Car icon. Below is just part of the written Directions for this route.
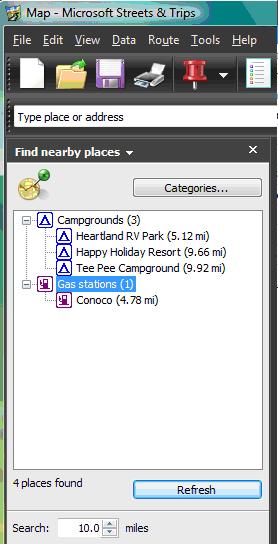
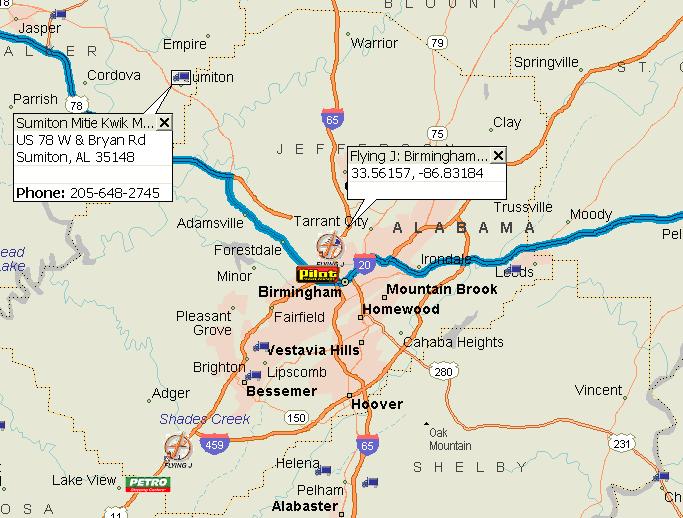
Once you have planned your route you can begin to look for Points Of Interest (POI) along the route. Already loaded within S&T are thousands and thousands of POIs. We activate this function using FIND NEARBY PLACES which is the little Pin sticking in a Globe sort of Icon. When you Click this icon another left column Pane will open. Near the bottom of this Pane you can set a distance for the computer to search from a tenth of a mile up to 50 miles out. Below we see the Find Nearby Places Pane and near the bottom it is set for 10 miles. Use the up down arrows to change the search distance.
NOTE ABOUT ZOOMING: There are a number of ways to zoom with S&T. I usually use Double Click. Put the cursor on a spot near where you want to take a closer look and Double Click. Each time you Double Click the map will zoom in closer and closer. There are a couple of other ways but for me that seems to be the fastest. CAUTION – Clicking on a POI icon may cause something other than zoom so if there is an icon you should click near it but not on it to zoom.
Next we Click on Categories to open another window pane. We can choose Restaurants which is a long list of types or restaurants (Chinese, Italian, Etc.) or we can Click to open the Places tab where we can selected the type of places we want to search for. For example we can search for things like ATMs, Campgrounds, Gas Stations, etc. We can search from a specific point on the map. Here again we can use Right Click. Once you have selected Distance (I now changed this to 2 miles) and Categories of interest go back to the map and pick a spot. Right Click and just as before a new Pane will open with options. Click Find Nearby Places.

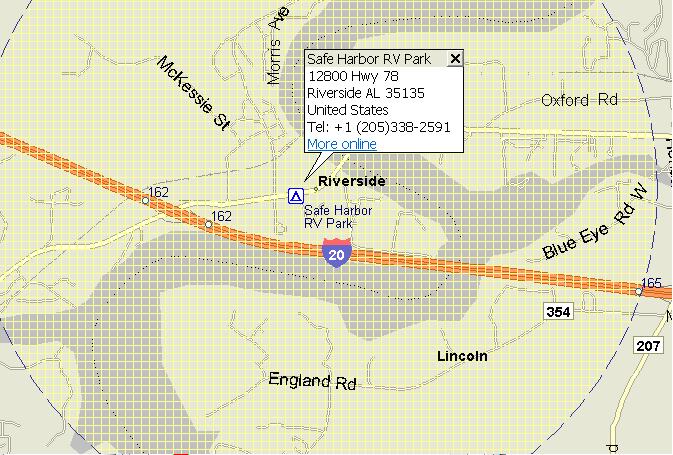
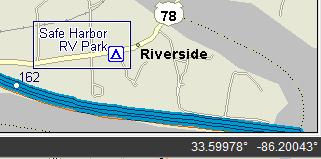
I Right Clicked near Riverside, AL and my Find Nearby Places said there was one campground within 2 miles of that location. I DOUBLE CLICK on the name of the location on my Find Nearby Places Pane and another little pane opens on my map giving me some details about that place. Note the crosshatch circle on the map – this is the 2 mile search area.
Another way to do this – with categories activated in Find Nearby Places zoom in on the area of interest. If you have some idea where you want to go this way is sometimes useful. See that little blue square with the blue dot in the center (next picture) – that is a POI. Click on the square for more information about that location.

After a Click you get a little more info on the map. Want more?
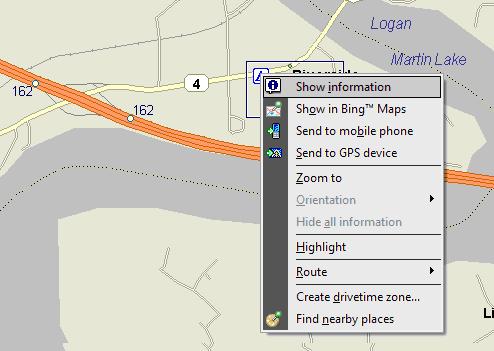
Right Click the spot and another option pane opens. Click Show Information.
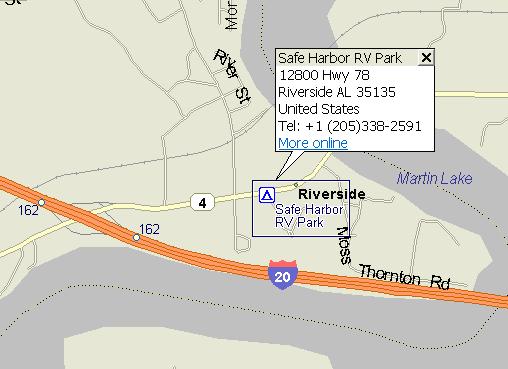
Now we see not only the name but an address and phone number. If we are on the internet we can Click More Online and it will take us to Woodall’s website where we can search for this RV Park. We can also look it up in our Woodall’s directory or if we have the Woodall’s CD we may already have it loaded in our computer. Or we can search online to see if this RV Park has a website. OR we can give them a call and ask questions and directions. Click the X in the upper right and it all goes away – clean map again – except for that little blue square and dot.
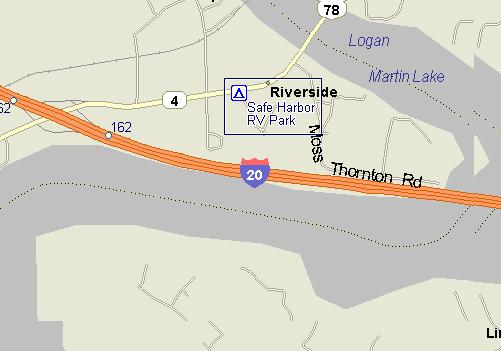
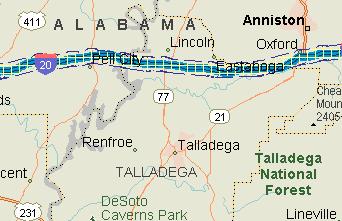
There is another way to use FIND NEARBY PLACES with S&T trips that can be cool or it can be confusing. Once we have had our route planned and calculated we can Right Click anywhere on the blue line that designates our route. But first – go into the Find Nearby Places and set it up for Campgrounds and 1 mile. This of course if you want to look for campgrounds within 1 mile of your Route - all along your route. If you look closely at the Route Line below you should see that it has a crosshatch of yellow. This shows us that Find Nearby Places is using the entire route to search for campgrounds (or whatever else has been selected).
Zooming in a bit on a selected part of the route shows more detail of the search area.
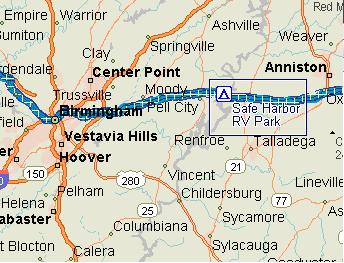
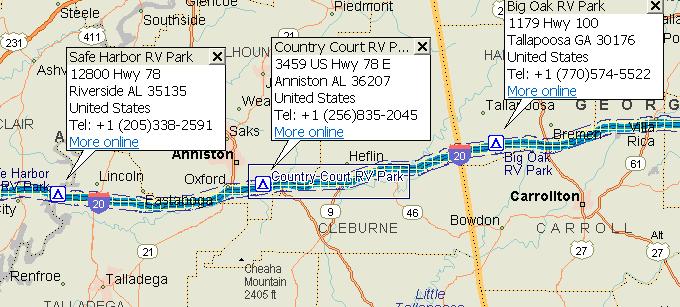
Our Find Nearby Places list now shows us it has found 3 campgrounds along our route. Click on a Campground name and an info pane will open on the map for each location.
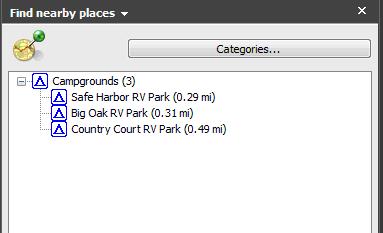
As you Click through the list a new little info box will open and the previous one will close. You can move through a long list to see if any location might be of use. You can do this for any category – not just campgrounds.
If you find a location you want to know a little more about you can Double Click on the name and a new little window opens with more info. You can also do this by Right Clicking on the spot on the map and then choosing Show Information. This can be a useful tool but on longer routes it can be very confusing. So there is just a brief look at what can be done with some of the things already loaded in Microsoft Streets & Trips 2010.
THE MEGA FILE
Though there are a great many POIs already in S&T there are many places where we can find more POIs to download to be used in S&T. The 2010 version of S&T made one huge advancement over previous versions. Discovery Owners Group is a bunch of motorhome owners. This group was originally all Discovery motorhome owners but now it seems there are other interested people involved. For many years these people have been working on POI files of interest to RVers. Prior to 2010 each file had to be downloaded individually and once the file was included in S&T the icons were on the map. People have been asking Microsoft for a better way. So the Discovery people and Microsoft people along with some other people such as Laptop GPS World forum users somehow got together and figure it out. They have created something called the MEGA FILE which can be found on the Discovery website and Laptop GPS World website. Here are some links about the MEGA FILE. Be aware that this only works as described with S&T 2010. POIs can be added to previous versions of S&T but they can not be turned on/off.
IMPORTANT NOTE: THE MEGA FILE AND ALL POI SOURCES I USE ARE TOTALLY FREE
Here is a You Tube video (very strange) that shows how the Mega File works.
http://www.youtube.com/watch?v=efvk2QvlVhc
DISCOVERY OWNERS POIs - Learn about the Discovery files and the group.
http://www.discoveryowners.com/cginfolinks.htm
http://www.discoveryowners.com/cginfo.htm
The Mega File can be found and downloaded on the Discovery website but I chose to use the version from Laptop GPS World.
MEGA FILE POI FROM LAPTOP GPS WORLD
This is where I went to download the Mega File in the long form so I did not have to un-zip it – it doesn’t take long – a few minutes - and if you have S&T 2010 (does not work with previous versions) the Mega File installs itself with a click.
MEGA FILE TUTORIAL and then some……….
If you have S&T 2010 in your computer all you have to do is go to either the Discovery website or the Laptop GPS World website in the above link and click to download. The rest is pretty much automatic. You will be asked where you want to save the file. I like folders and neat file keeping so I have a Streets and Trips POI folder which is where I save all these things. Save it as Mega File and you can tell it to put a shortcut on your desktop to make it easy to access. You can use this to open S&T or you can use your original S&T for normal use and only open the Mega File when you need it. In other words all you have to do to start S&T is to click on the Mega File icon or the file where you saved it – I save it as a document but it is really the program with the files – I hope I am not making this more confusing than it is – it is really very simple.
Here’s some of how it works.
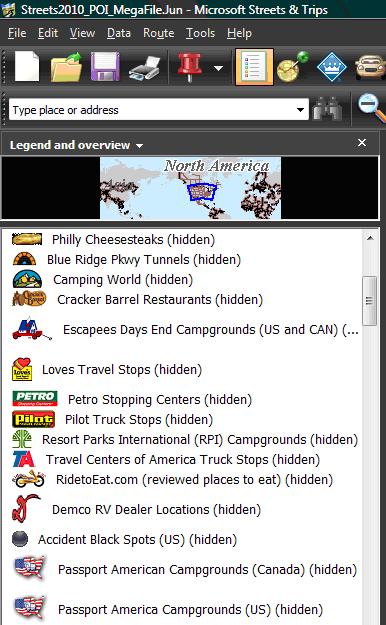
When you start S&T from the Mega File shortcut it will open with the map and with Legend and Overview pane in the left column. If Legend is not open just click the icon to open. Below shows the first few entries in the Mega File for the June 2010 download. This will change on a regular basis - The Mega File is continually updated so it is a good idea to check it online at Discovery every month or so and then download the newest version. You will see what has been changed on the website so if it is not something of interest to you it may not matter if you update. NOTE: that each file name has the word (hidden) after it. That tells us that file is turned off. To turn any file on just Right Click on the file name and a new pane opens.
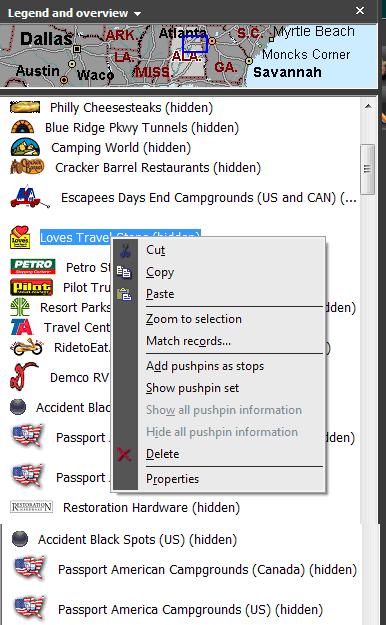
Below I have Right Clicked on Loves Travel Stops and the new pane opens – to show Loves locations on my map I just Click SHOW PUSHPIN SET and S&T does the rest.
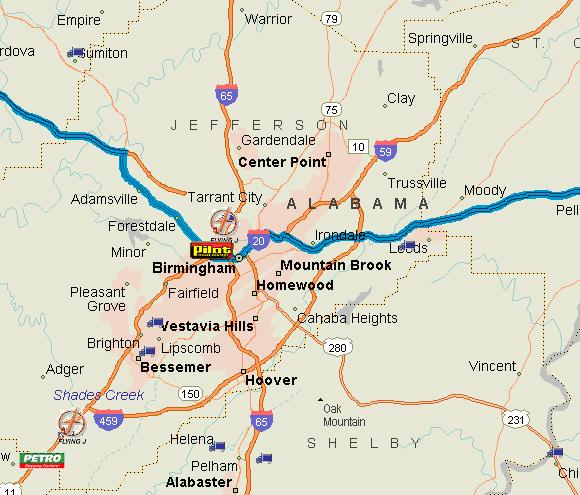
Here is a small part of my map after I turn on Loves, Flying J, Pilot, Petro, and AITA Truckstops (those little blue trucks are AITA truckstops – Properties pane tells us there are 5,256 locations on this list) – AITA is the American Independent Truckers Association – So now we know there are a few fueling possibilities along our route. But we want to know more.
Right Click on the location of interest and another pane opens with options – we want S&T to show us the info for the location we chose so Click Show Information in that pane. We now have more info about that location which we can turn off by Clicking the X. Another word of warning about any and all POI locations in any and all GPS devices – there is no guarantee with any of this so you want to verify locations by phoning or by finding the website of the business or whatever. We have found some POIs don’t exist or the location can be off by miles. This is a great tool but users need to be aware that none of this stuff is perfect. We do not know who created many of these POIs. Example would be that most of the campgrounds that come with S&T are from Woodall’s but we have found many of them to be incorrectly located. When checking for campgrounds we find we can use Google Earth and the LatLon for the specific campground to take a look at Google Earth to see what that location looks like. How? Scroll down.
Wherever I put my cursor on my map there will be a set of numbers on the lower right hand corner of S&T that tell me the exact Latitude and Longitude of the location where my cursor stops. So for that RV park in Riverside, AL I see that the Latitude is 33.59979 and Longitude is -86.20030 . I can use these numbers to take a look at this location in an image on Google Earth – another warning goes here – Google Earth photos probably were not taken yesterday or last week or last month or last year. There is a date near the lower left of the image in Google Earth that tells us the date the image was taken. Why do I use Decimal Degrees? Most POIs I have ever found are in the Decimal Degrees format.
Download Google Earth for FREE here > http://earth.google.com
THIS IS THE LOWER RIGHT CORNER OF MY S&T MAP
Put your cursor on the exact location you might want to know the LatLon of and see the numbers at the lower right. Now hold down Control (Ctrl) and Alt keys and tap the letter c – this captures those numbers into clipboard and they can now be Pasted to the “Fly to:” line of Google Earth - or any other location you might want to Paste them. Just another cool trick those S&T developers dreamed up to help us out.
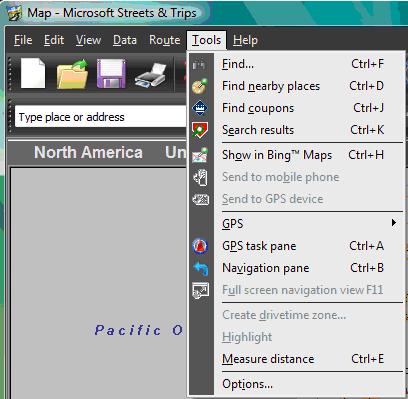
Click TOOLS to format LatLon in S&T. NOTE:Tools again duplicates some of the Toolbar functions.
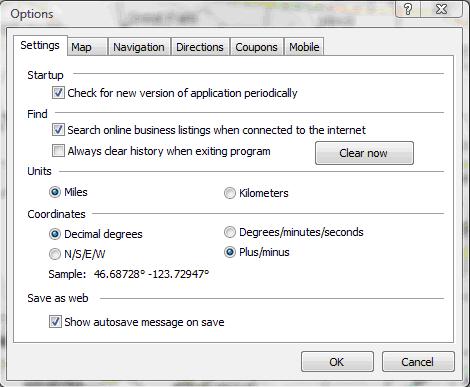
Click OPTIONS to open a new Pane where you can change some settings.
In OPTIONS and the SETTINGS tab we can select Miles or Kilometers and/or the format used for our Lat/Lon. Many POI files are produced in Decimal Degrees so we always use Decimal Degrees and also Click Plus/Minus. We can change to Degrees/Minutes/Seconds – N/S/E/W if the need arises but most GPS files we see these days use Decimal Degrees. You can change things in other tabs but they do not concern us at this time.
LATITUDE AND LONGITUDE NOTES: LAT runs East and West. Zero (0) is the Equator. The most southern Lat in the continental US is at about 24.5 degrees north. The most northern Lat in the continental US is about 49 degrees north. North is always plus (+) and is understood so does not need to be included as part of the number. LON runs North and South and this hemisphere is West which is minus (-) which must be shown as part of the number or the map will be in China. The most eastern point in the continental US is around -67 degrees. The most western point in the continental US is around -124.5 degrees. Short version – LAT = 24 to 49 LON = -67 to -125
MORE POIs FOR S&T 2010
Even with everything that comes with S&T 2010 and all the POIs in the MEGA FILE there are some POIs we might like to have that are not in our computer yet. What do we do about that? Here are a couple of sources of free POIs. Some of the more popular POIs on these websites may eventually find their way into the Mega File. These are all FREE!
POI FRIEND http://poifriend.com
POI FACTORY http://www.poi-factory.com
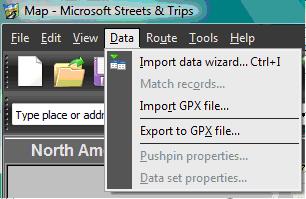
For S&T you want to download a basic .csv (comma separated values) file or a .gpx file. The files on the websites above may have a number of format options to choose from. For .csv we probably want the basic Garmin file (not Garmin with other words attached to it). If the file is zipped we want to extract it. Create a folder into which you will save your POIs. When you are prompted DO NOT OPEN POI files. You want to SAVE POI files. Once you download a POI file and save it close out of the wizard and find the file in the folder you created to save it in. RIGHT CLICK on the POI file name and then Click to Extract the files. Save them again. I then delete the zipped file and save only the unzipped file. Now you have either a .csv or .gpx file saved in a folder. How do I add the file to MS S&T 2010 and the Mega File? Open the Mega File version of S&T and click DATA. Data will open the Pane showing the different options for importing POI files. For .csv files choose IMPORT DATA WIZARD and for .gpx file choose IMPORT GPX FILE as shown below. If there is an option for the POI (either/or) I prefer .csv files but others may prefer .gpx files. I find .csv easier to work with if I want to make changes or additions. With many POI files you can also download the icon/symbol for that POI which will usually be a .bmp file. Be sure to choose to download the symbol with the file if one is available.
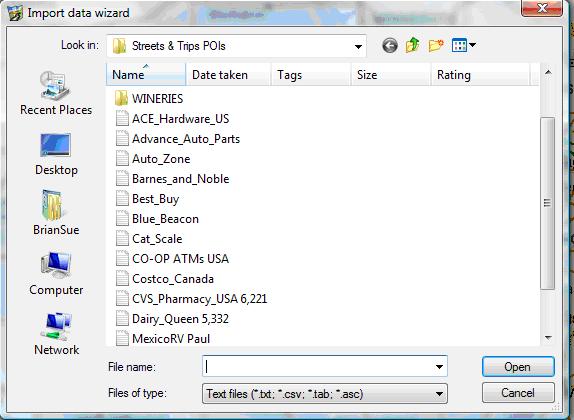
Clicking the Import Data Wizard will open a new pane like the one below. There will be all the S&T POI files saved in the POI Folder in the .csv format. I’ll use Ace since it is first. DOUBLE CLICK Ace. If you created nice folders your POI files will be easy to locate.
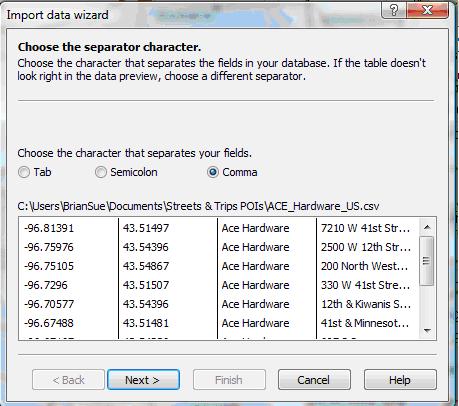
Another window pane. Since we are using .csv our separator is a comma so we make sure that is marked. Click Next.
Our Import Data Wizard Pane changes again. This time we have some work to do. Note it has listed Longitude numbers in the first column and then Latitude and then the name of the business and then the address. We need to change the Column Heading and the Data Type line accordingly. Not everyone who creates POI files does it the same way so each file could be a different set-up.
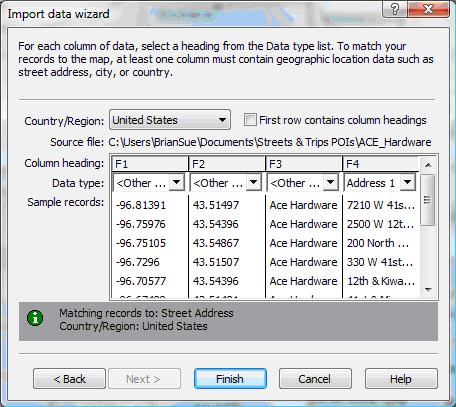
I wrote Lon on the column heading and then Double Clicked the down arrow in that column which opened another long option pane where I will select Longitude since that is what the numbers in that column represent. I will then change F2 to Lat and click that down arrow and set that Data Type as Latitude and so on.
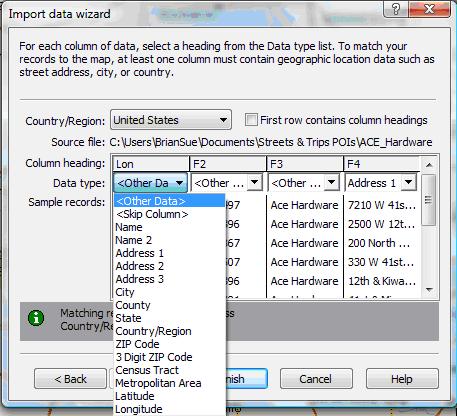
I have changed the column headings and Data Type in all columns below – next I will click Finish.
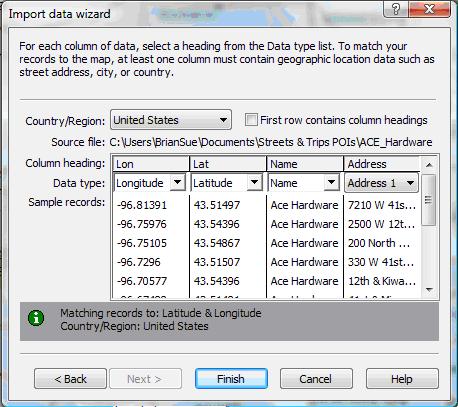
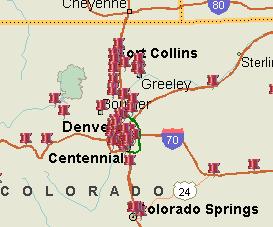
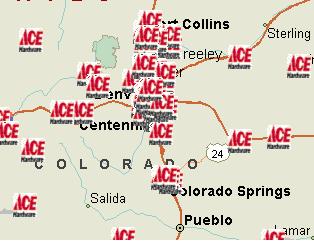
After Clicking finish S&T will take a few moments and then little pushpins will appear all over my map. Below is just the area around Denver as an example (I zoomed). These should all be Ace Hardware stores. How will I know that?
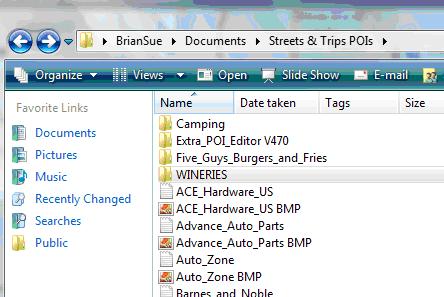
When I downloaded the POI file for Ace I also downloaded a .bmp file which is a symbol or icon for Ace that I can have S&T put on my map to show me that these are Ace locations. Below is just a part of what my POI folder looks like. Note Ace and the Ace .bmp file. I go back to my S&T and open Legends And Overview which shows all the Mega File POIs as well as any POI file I have added.
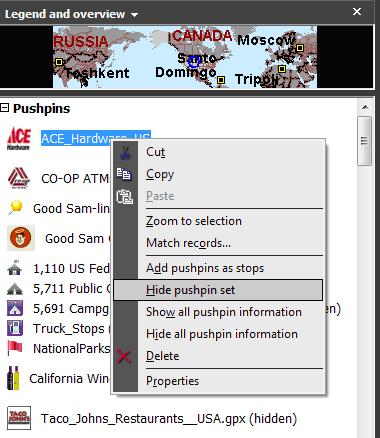
Here is Legends And Overview showing Ace with the red pushpin and I have Right Clicked on Ace to open the next Pane of options. I will click on Properties.
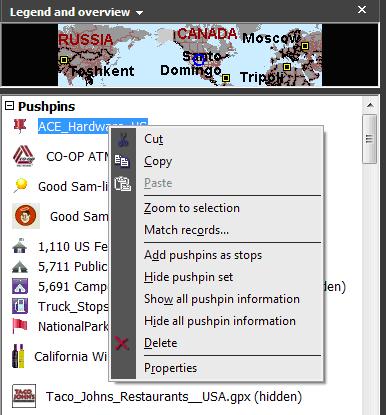
When I Click Properties another window pane opens near the middle of my screen. See Symbol: and the red pushpin and the down arrow. I click the down arrow and another pane opens with a whole bunch of symbol icon options and a side slider. I slide up to the top of the options where there is a line for Import Custom Symbol which I will click on.
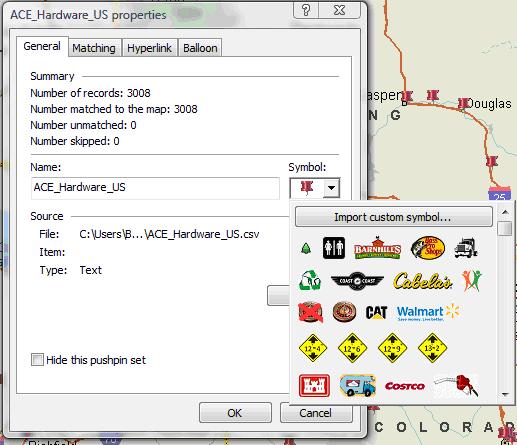
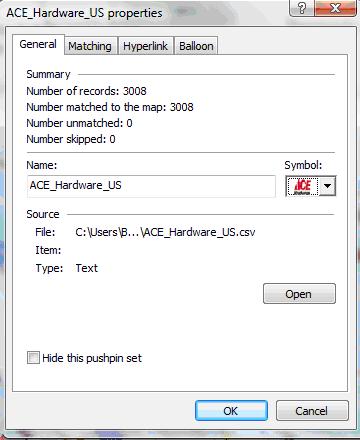
Clicking Import Custom Symbol took me to my POI folder where I Double Clicked on the Ace .bmp which added that symbol/icon to my S&T file of symbols. Clicking on the Ace symbol moved it to my Symbol box in Properties as seen here. I will Click OK.
And now instead of red pushpins my map has a whole bunch of little Ace symbols showing the location of lots of Ace stores – actually this file has 3008 Ace hardware locations. As I travel and am in specific locations I can zoom in to find the Ace store nearest to wherever I might be.
When I get close to a location I can again Right Click on that location and choose the Show Information option to learn more about that specific POI. Some POI lists do not give a lot of info and some give too much info.

The Ace file is now added to my Mega File and I can take all of these symbols off my map by Right Clicking on the Ace file and selecting Hide Pushpin Set. This will then change my Ace file line to show (hidden) like the rest of my files and there will be no symbols on my map. But I just added another way to use S&T to locate more places of interest on my map. I can do this with thousands of different POIs.
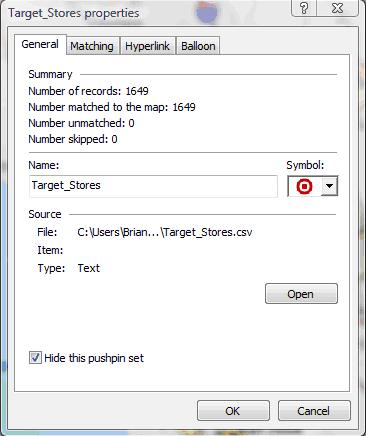
If we download a POI file from one of the POI websites we can check Properties after we import it to S&T. Right Click the file name in the Legend and then Click Properties as I have done with Target Stores below. Note the Symbol. Also note the Number of Records. Sometimes the number for records does not match the Number Matched to the Map. I couldn’t find a sample while writing this but I have seen them. There may be a number by Number Unmatched or by Number Skipped. If this happens you can open .csv files in Notepad by clicking the file in your folder in documents where you saved the file. The .csv files can be edited in Notepad. Some errors can be corrected if you can see them. If the file creator left out a minus (-) you may be able to find it – sometimes at the very bottom of the list – and then add the minus (-) to correct it. There may be other errors you can find and correct. But I do not yet know how to open and correct .gpx files so I only use them if there is no .csv file available. Leaving out a decimal point could be another easy fix – just put one in.
That’s about it for POIs. That should be plenty to work with. Working with POIs will get very easy after you do a few of them. The whole thing is pretty amazing to me.
We have purchased a new version of S&T each year since 2006 and each year it gets better. This whole Mega File thing is new for 2010. There is a lot of other new stuff. And the maps themselves improve every year. The full S&T with a GPS receiver costs around $70 and loads into your laptop from a DVD the GPS receiver plugs into a USB port. If you have a GPS receiver from a previous year S&T only costs about $35. Certain Garmin models can be used with S&T as receivers. NOTE: You may be able to download S&T from the Microsoft website for a FREE 60 day trial to play around and learn it before you pay for it – another very nice feature.
Here are more websites where more can be learned about Microsoft Streets & Trips 2010 with GPS (2011 will be here soon).
http://www.microsoft.com/Streets/en-us/default.aspx Microsoft website for Streets & Trips
http://streetsandtrips.spaces.live.com This is the Microsoft S&T Team Blog where the actual MS Developers provide tips etc.
http://www.youtube.com/view_play_list?p=750E995C969A47B3 S&T Tutorials on You Tube.
LAPTOP GPS WORLD WEBSITES
http://www.laptopgpsworld.com Learn about several programs that can be used in a laptop with GPS.
http://www.laptopgpsworld.com/microsoft-streets-trips S&T tips and info.
http://www.laptopgpsworld.com/749-tips-tricks-microsoft-streets-trips Tips & Tricks from experts.
http://www.laptopgpsworld.com/2380-review-microsoft-streets-trips Review of S&T with links to useful stuff.
:
Submitted by Brian Robertson - 8/09/10
Click Your browser's "Back" button to return to the previous page
or chose another category from the side menu.
The RV Tech Library is brought to you by the TiffinRVnetwork
Absolutely No Affiliation exists between this group and Tiffin Motor Homes Inc or the Allegro Club. This website neither endorses or discourages the use or purchase of a Tiffin product. All references, suggestions, comments, etc. contained herein are the opinions/experiences of the posters and not those of Tiffin Motor Homes Inc. or the website administrators.
|
|